Aspen Collar
Disclaimer
These guidelines have been produced to guide clinical decision making for the medical, nursing and allied health staff of Perth Children’s Hospital. They are not strict protocols, andthey do not replace the judgement of a senior clinician. Clinical common-sense should be applied at all times. These clinical guidelines should never be relied on as a substitute for proper assessment with respect to the particular circumstances of each case and the needs of each patient. Clinicians should also consider the local skill level available and their local area policies before following any guideline.
Read the full CAHS clinical disclaimer.
|
Aim
To guide staff in the correct sizing and application of Aspen® collars in children.
General
Aspen® collars are an orthotic device that assists in immobilising the cervical vertebra by maintaining the patient’s head in a neutral position, whilst at the same time promoting patient comfort.
The application and removal of the Aspen® collar (or other immobilising orthotic device) has the potential to render the cervical spine unstable and as such should only be performed by appropriately trained staff as per the guidelines set out below.
Indications
Full spinal precautions are implemented for all patients with a suspected spinal injury until further orders are documented in the progress notes by the appropriate medical staff.
The initial care of a patient with an actual or potential spinal injury is to stabilise the spine and prevent further neurological injury by maintaining neutral alignment of the vertebrae.
Staff Education and Training
The role-based education and training for staff in the application of the Aspen® Collar in the Emergency Department (ED) can only be delivered by an appropriately trained Orthotist; appropriately trained ED Clinical Nurse Specialists (CNS); and appropriately trained ED Staff Development Nurses (SDN).
The sizing / re-sizing and application of an Aspen® collar in the Emergency Department (ED):
- can only be performed by an Orthopaedic Registrar or Consultant or appropriately trained Emergency Department (ED) Medical and Nursing Staff or a trained Orthotist after a referral for a collar has been completed.
- Note: the person maintaining the patient position during application of the Aspen® collar must have received training in spinal immobilisation in ED (i.e., cervical / head hold and deemed capable of performing this role).
Changing of an Aspen® collar (without changing the size of the collar) can only be undertaken by:
- appropriately trained nursing staff who will at the same time perform a thorough skin inspection and ensure hygiene and skin integrity are maintained.
Cessation of Cervical Immobilisation therapy once clinically cleared, can be undertaken by:
- nursing staff upon the written request of the Orthopaedic Team.
- appropriately trained Emergency Department Medical, Orthopaedics Consultant or Registrar or Orthotics Staff and Nursing Staff.
Sizing Position and Technique
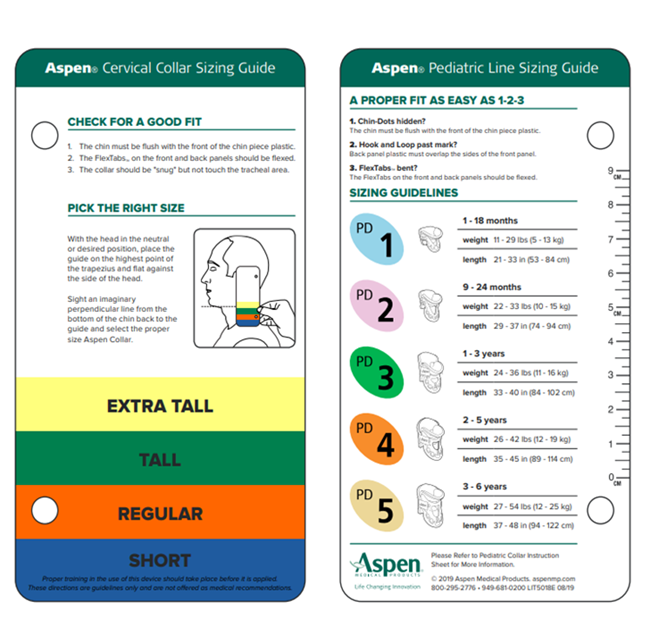
The correct sizing of the Aspen® Collar is important for effective immobilisation and patient comfort. The patient’s head is to be always maintained in a neutral alignment with manual inline stabilisation.
If deciding between two consecutive sizes, try the smaller size first but use the largest size that fits comfortably and maintains desired treatment position.
Application of the Aspen® Collar
Watch the video – Aspen Pediatric Collar Practitioner Inservice Video – YouTubeAU Video (external website).
The Aspen® collar is a two-piece design consisting of a front and a back piece. Two trained people are required for the initial collar placement,
- the first person is to provide cervical spine immobilisation and maintain alignment of the head, neck and upper airway,
- the second person is to fit and position the collar.
Perform a full set of neurovascular observations prior to and after collar application and when moving the patient.
First person – Maintaining the patient position
- Maintain the patient’s head in a neutral position throughout the application of the collar.
- Manually stabilise the patient’s neck with a head hold.
- Prevent pressure on the child’s chin or occiput and maintain appropriate airway and cervical spine alignment. Consider thoracic padding on supine patients aged under 8 years of age. Padding may be made from folded sheets / blankets but must be of appropriate height to offset the occipital prominence.
- Ensure the bed is at the correct height for the person holding the head.
- Ensure the patient is lying in a supine position, arms by their side and head in a neutral position. (i.e., nose in line with umbilicus).
- Hands are placed on lateral portions of the patient’s head, fingers spread around the mandible and back of neck, and thumbs on the patient’s cheek.
- Firm pressure must be applied to restrict possible neck movement.
Second person – Application of the collar
Changing the Aspen® Collar
- The Aspen® collar may need to be removed to change the collar or the pads or for pressure injury prevention.
- Ensure the patient is supine.
- The first person holds the patient’s head and maintains neck stabilisation to allow the second person to undo the Velcro® and remove the front half of the collar
- The second person gently slides the back half of the collar out from under the patient’s neck (press gently on the mattress to create more room to manoeuvre the collar).
- The first person must always maintain neck stabilisation whilst the new collar is applied.
- Use appropriately trained staff to perform a log roll to provide pressure care and for patient repositioning. See Spinal Precautions – Clinical Practice Manual (internal WA Health only).
References
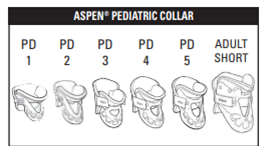
- Aspen Cervical Collar Sizing Guide & Aspen Paediatric Line Sizing Guide – Product Brochure
- Aspen Paediatric Collar Product Guide – Product Brochure
Appendix 1: Aspen® Cervical collar sizing guide & Aspen Paediatric sizing guide
| Endorsed by: |
Co-Director, Surgical Services (Nursing) |
Date: |
Nov 2024 |
This document can be made available in alternative formats on request for a person with a disability.