Intraosseous access
Disclaimer
These guidelines have been produced to guide clinical decision making for the medical, nursing and allied health staff of Perth Children’s Hospital. They are not strict protocols, and they do not replace the judgement of a senior clinician. Clinical common-sense should be applied at all times. These clinical guidelines should never be relied on as a substitute for proper assessment with respect to the particular circumstances of each case and the needs of each patient. Clinicians should also consider the local skill level available and their local area policies before following any guideline.
Read the full PCH Emergency Department disclaimer.
|
Aim
To guide PCH staff in the insertion, care and removal of intraosseous needles in children.
Background
- The intraosseous space functions as a non-collapsible vein.
- The emissary veins of the intraosseous space absorb all parenteral medication, crystalloid fluids and/or blood products – which move quickly into the central circulation.
- Serious complications are uncommon.
- Patient weight, anatomy and overlying tissue will determine the appropriate size of the intraosseous needle set.
- Collect marrow from the intraosseous needle prior to flushing and infusing fluids.
- It is possible to perform biochemistry, group and hold/cross-match, blood cultures and blood glucose level. Full Blood Count (FBC) from marrow is not available for processing by pathology.
- Do not run sample on blood gas machine as this damages the equipment.
- Ensure all blood tubes sent to lab are clearly labelled “Intraosseous”.
- All medications and fluids which would normally be given intravenously can be given via intraosseous route.
- Optimal flow rates are achieved by infusing medications and fluids under pressure. Fluid will not infuse by gravity.
- The Intraosseous route provides reliable access until longer-term access can be established. Alternative intravenous access should be obtained as soon as possible (ideally, intraosseous access should not be used for greater than 24 hours).
Indications
- Cardiopulmonary arrest in patient without intravenous access
- Any critical emergency where gaining intravenous access cannot be achieved within 60 seconds.
- Oral, transmucosal, intramuscular or inhalation routes are not adequate to meet the patient’s needs for fluids and/or medications when intravenous access is unobtainable.
Contraindications
- Fractures: do not place an intraosseous below a fracture site, use an alternative site.
- Open injury: avoid placement of an intraosseous below any open injury on an extremity, use an alternative site.
- Infection or burn at potential site: use an alternative site.
- Previous significant orthopaedic procedure at the site.
- Bone Pathology (osteoporosis, osteogenesis imperfecta).
- Site of previous intraosseous insertion (within previous 48 hours).
Equipment
- There are a range of commercially available intraosseous needles:
- PCH ED and Operating Theatres have the 3 cm length only.
- The EZ-IO® needles can be used manually if required in the event of drill failure (with manual attachment).
- Alcohol swabs or Povidone-Iodine solution
- 10 mL syringe for aspiration
- 10 mL syringe with 0.9% sodium chloride for flush
- 3 way extension tap
- Clean gloves
- Tape
|
- Intraosseous insertion device EZ-IO® (See Appendix 1 for storage and technical consideration)
- Use the 15 mm needle (pink) for 3-39 kg
- Use the 25 mm needle (blue) for > 39 kg patient
- 45 mm needle (yellow) available for obese older patients
- Alcohol swab or Povidone-Iodine solution
- 10 mL syringe for aspiration
- 10 mL syringe with sodium chloride 0.9% for flush
- 3 way extension tap
- Clean gloves
- EZ-Connect connection (comes with needle)
- EZ- stabiliser dressing (optional)
|
Procedure
Identification of entry site
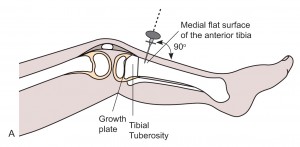
- The most common and preferred site in children is the proximal tibia: anteriomedial aspect of the tibia. 2-3 cm below the tibia tuberosity.
- Alternative sites are:
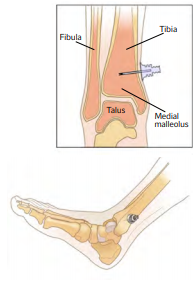
- Distal tibia – 2-3 cm above the medial malleolus4
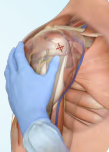
- Proximal humerus - anterolateral shoulder into greater tubercle
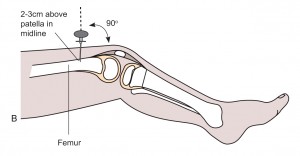
- Distal femur: 2-3 cm above the patella, in the midline
- Use aseptic technique.
- Clean skin at chosen site, allow to dry.
- Stabilise the leg.
- Infiltrate with lignocaine 1% if child is conscious and time permits.
- Insert the intraosseous needle at 90° angle to the skin, until bone is felt.
- Use firm pressure with a “to and fro” twisting motion to insert into the bone cortex.
- A “pop” or loss of resistance may be felt as the needle passes through the bone cortex into the marrow cavity.
- Remove the inner stylet from the needle.
- Confirm the position by aspirating marrow or flushing with 5-10 mL of sodium chloride 0.9% (should flush easily with no extravasation if marrow is not aspirated) and send marrow to lab for tests if aspirated.
- Secure intraosseous needle in place using tape
- Proceed with infusion
|
- Use aseptic technique
- Clean skin at chosen site, allow to dry
- Stabilise the leg
- Infiltrate with lignocaine 1% if child is conscious and time permits
- Attach compatible intraosseous needle to end of device driver (magnetic attachment). Pierce the skin with the intraosseous needle until bone is felt
- Aim the needle perpendicular to the flat surface of the bone
- Push the needle tip through the skin until the tip rests on the bone. Check that at least one black line is visible on the needle. If black line is not visible, the needle will not be long enough to reach the medullary space.
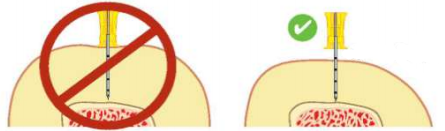
Use longer needle if black line not visible.
- Squeeze the trigger, guiding the needle into the bone
- You may feel a “give” as the needle enters the bone marrow cavity - at this point release the trigger
- Hold the hub and detach the needle from the device
- Hold the hub and remove the inner stylet from the needle with a counter clockwise rotation
- Confirm the position by aspirating marrow or flushing with 5-10 mL of sodium chloride 0.9% (should flush easily with no extravasation if marrow is not aspirated) and send marrow to lab for tests if aspirated.
- Place EZ-stabiliser dressing over the hub.
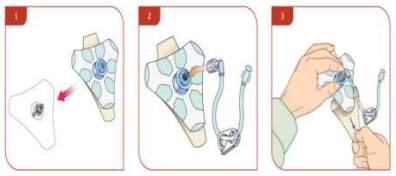
- Connect extension set to the hub, securing firmly.
- Stabilise the extremity.
|
Confirmation of Intraosseous placement
Confirm intraosseous placement using the following methods:
- Pop or ‘give’ felt during insertion
- Stability of catheter in bone
- Aspiration of bone marrow (inability to aspirate does not mean inappropriate placement)
- Able to flush without signs of extravasation or swelling.
Post-Procedure
Once position is confirmed:
- Secure intraosseous needle in place
- Attach a 3 way extension tap
- Infuse injections through the 3 way tap side port
- Connect IV fluids through the other 3 way port
- IV fluids will need to be infused under pressure or bolused using a 20 mL syringe. Gravity is insufficient to drive fluid through an intraosseous needle.
- Assess the patient and site for:
- Discolouration of limb or swelling.
- Pain, altered sensation in limb.
- Skin temperature change.
- Weak or absent pulses.
- limb firmness or taut compared to the other limb. Especially in the first half hour.
- Stop infusion if signs of these and inform treating doctor.
- Observe for complications I.e, discolouration of limb, swelling, pain, altered sensation in limb, skin temperature change, weak or absent pulses, limb firmness or taut compared to the other limb. Especially in the first half hour.
- Perform hourly neurovascular observations (NVO) on the limb from the time of insertion during the first 24 hours and/or while intraosseous access is in situ and/or intraosseous infusion is running.
- Document insertion date, time and location.
- Ambulation should be discouraged until the intraosseous catheter is removed to reduced risk of dislodgement. 4
- Consider using other limbs for measurement of clinical vital observations (e.g., blood pressure) even after removal of intraosseous access.
Complications
- Dislodgement
- Extravasation
- Compartment syndrome
- Infections – cellulitis or osteomyelitis
- Bone fracture or growth plate injury
- Pain5
- Fat and bone microemboli (rare).
Removal and aftercare
- Intraosseous access should not be used for greater than 24 hours. Alternative intravenous access should be obtained as soon as possible.
- Intraosseous access should be removed once alternative intravenous access is established or there are complications (signs of infection, extravasation or compartment syndrome).
- The intraosseous access should be removed prior transfer to the wards (with the exception of transfer to PCC) if patient has alternative IV access.
- After removal of the intraosseous access continue 4 hourly NVO for a further 48 hours as per Neurovascular Observation and Assessment Procedure and PIVC insertion and Maintenance.
- To remove intraosseous access:
- Remove extension set from needle hub and attach a 5 or 10 mL sterile syringe with standard Luer lock to act as a handle and cap the open intraosseous port.
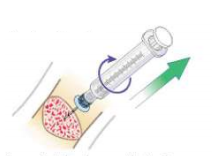
- Grasp syringe and continuously rotate clockwise while gently pulling until the needle is removed. 4
- Maintain 90° angle to the bone - do not rock or bend the needle during removal.4
- Apply pressure to site as needed; apply occlusive dressing as indicated.
- Monitor site 4 hourly for delayed signs of infection, haematoma, extravasation or compartment syndrome 4 using age appropriate Neurovascular Observation form (Refer to Neurovascular Observation and Assessment procedure).
- Document removal date and time, along with a description of the site at the time of removal, in the patient notes.
- If patient is to be discharged from PCH prior to 48 hours post removal of the intraosseous access, provide education on wound care, pain management and monitoring for infection.
References
- Paxton J.H. Intraosseous Vascular Access: A Review. Trauma; London. Vol 14(3) 195-232. 2012
- CE Perron. Intraosseous Infusion. UpToDate. Updated June 2021. Available from: https://www.uptodate.com/contents/intraosseous-infusion
- 3EZ-IO Product Information – available at https://www.teleflex.com/anz/en/product-areas/emergency-medicine/intraosseous-access/arrow-ez-io-system/index.html
- EZ-IO Product Information – available at www.vidacare.com/EZ-IO
- ARROW® EZ-IO® Intraosseous Vascular Access System. 2017 Third Edition. The Science and Fundamentals of Intraosseous Vascular Access. Available from: EZ-IO_Science_Fundamentals_MC-003266-Rev1-1.pdf (teleflex.com)
- Installing an Intraosseous Infusion System (EZ-IO®), Vidacare [Accessed August 2021] Available from: Installing an intraosseous Infusion System (EZ-IO®) (creehealth.org)
- Advanced Paediatric Life Support, Australia & New Zealand: The Practical Approach, 6th Edition Published February 2016.
Appendix 1: EZ-IO® Storage and other technical considerations
Storage
- Expected shelf life for the EZ-IO® Power Driver is 8 years or approximately 500 insertions.
- Life expectancy is dependent on actual usage (bone density and average insertion time), storage, and frequency of testing.
Battery information
- Drivers are sealed and not intended to be opened.
- Batteries are not replaceable.
Indicators and alerts
- EZ-IO® Power Driver LED will be solid green when trigger is activated and has sufficient power.
- EZ-IO® Power Driver LED will flash red when the trigger is activated and has only 10% of battery life remaining.
- Purchase and replace the EZ-IO® Power Driver when the red LED begins flashing.
| Endorsed by: |
Co-Director, Surgical Services |
Date: |
Mar 2025 |
This document can be made available in alternative formats on request for a person with a disability.